Popular Posts

Wednesday, 13 January 2016

Makarshankranti special- Till Gur ladoo and tikki

                       Till Gur ladoo/Tikki


Hi Everyone,
Once again Happy Makarshankranti!
 On this very occassion we make various type of til sweet preparations.
Among them Till gur ladoo is very famous and made by every indians. It is a traditional sweet .

So,
we are here with Very famous Till Gur ladoo and til Gur tikki.

Muh toh meetha karo..

Ya, Without loosing much more time, let us make ladoos.

Preparation time:0minutes
Cooking time:10-15 minutes
Make 8-10 ladoos

Ingredients-
2cup white sesame seeds ( white til)
1cup jaggery( Gur)
1/2 cup water
1/2 tsp of  ghee for greasing hand

Method-

*Heat a pan/kadhai.
Add sesame seeds ,dry roast the sesame seeds in a pan on medium heat till they light golden brown in colour.
This will take around 5-6 minutes.

*you will find a nice aroma from them.
* once done,  let it cool down .
*keep aside.

* Heat a pan/kadhai. Add Gur jaggery ( Gur)
and 1/2 cup water.
*Cook on medium heat for at least 5-6 minutes or until the jaggery ( Gur) become thick syrup.
( How to check jaggery syrup ( Gur ki chasini)---
After 4-5 minute of cooking the Gur,you will find that Gur are forming bubbles and  leaves the pan / kadhai.This is a accurate time to check the consistency.

Take a drop of boiling  syrup put in a bowl  of  water. After few seconds, take it out.You will find it is harden enough to form a ball - make a  small ball.
If it is not done ( semi hard ball like consistency).Cook for another  few minutes and check again.
It should be thick syrup like consistency.
If you ignore this procedure, you will not get acqurate cruncy flaky tasty ladoos/tikkis.
This is very important part of making til - Gur ladoo/tikki.
So, make sure that your Gur ki chasini is forming bubbles and  leaving the pan.

*Once syrup is ready add roasted sesame seeds on Gur syrup. Mix it thougrouhly.
Keep mixing until seasame  seeds coated with jaggery syrup.

*switch off the gas. Rest for 2-3 minutes. Make sure that the mixture is not very hot.
It should be lukewarm.

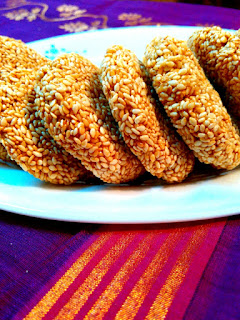
*Grease your palm with  little ghee. Take a small amount  of til gur mixture to form small size ladoos.
*Roll it between your palm untill round enough and smooth in texture.
*Repeat the same procedure to make all ladoos.
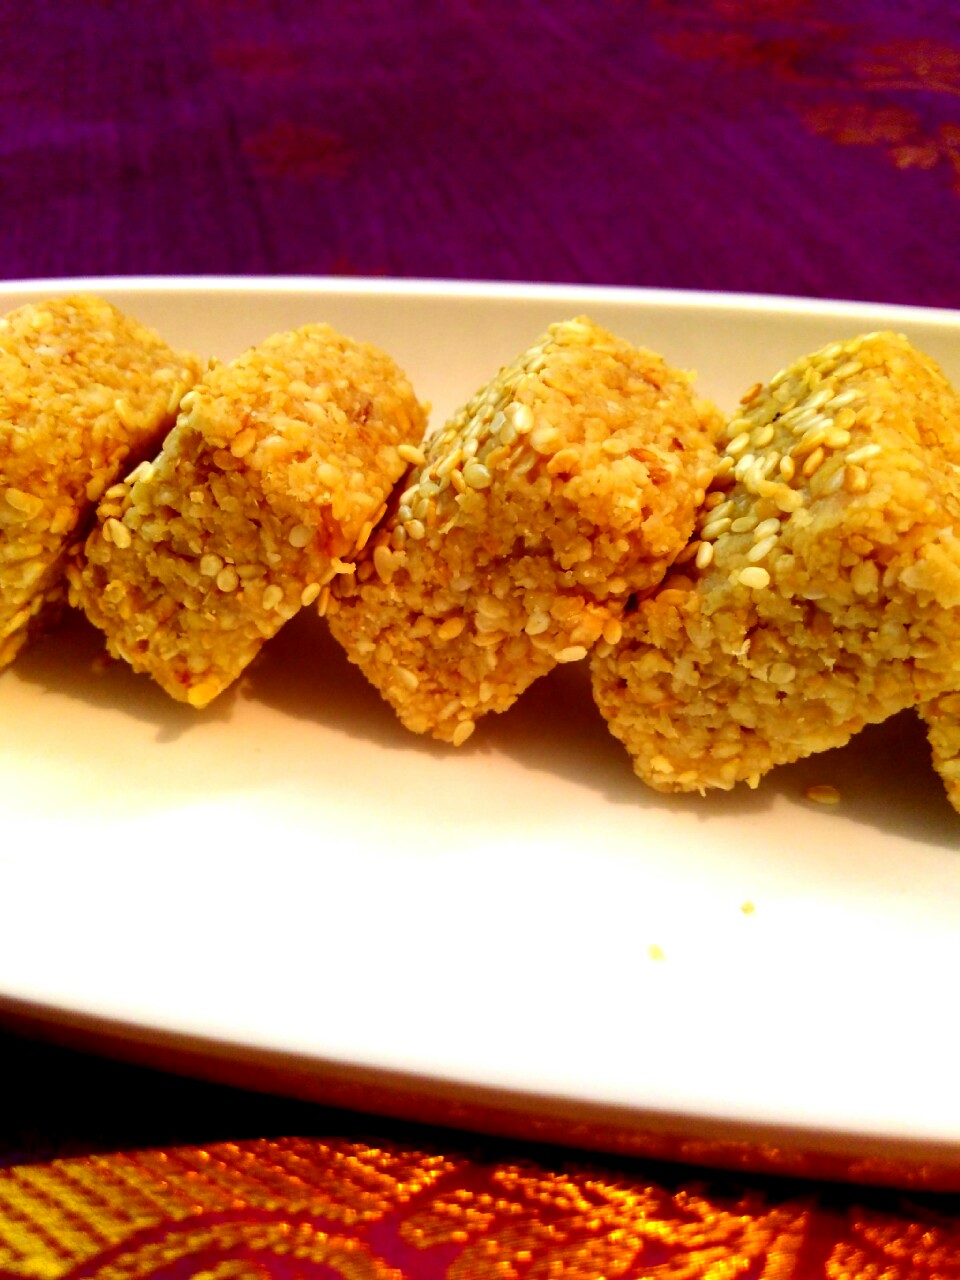
( you can make tikki shape by pressing till - Gur mixture with the help of your palm.)

Rest it for an hour. Once it cool down it will little harden but chruncy.

*you can store these ladoos/ tikkis  in a air tight container for 7-10 days and enjoy eating it in evening or leizure time.


That's all for today.

Enjoy makar shakranti.

Till then,
Bye.
Asha
Archana

Our thoughts
Cook& Share
Happy Cooking.


Makarshankranti special- Til mawa Barfi

                                   Till ki Barfi


Hi, everyone,

Happy makarsankranti to everyone!
India is land of festivals.
We enjoy each moment of life by celebrating many festivals time to time through out the year.
Today is makarshankranti.
My mamma always make til-gur and murmura preparations for this occasion.
We enjoy by eating many times..because we make abundant amount of till ladoos and barfi and enjoy through out  for at least 7-10 days.

Here I am going to share with you,.my mom special til ki barfi..which is made from white till(sesame) and khoya(mawa) and sugar.
Very tasty and very delicious.

Let's make this

                                    Til ki barfi


Preparation time-0minutes
Cooking time-15-20 minutes
Makes 10-15  barfi

Ingredients-
2 cup white sesame seed( Til)
1 cup grated khoya (Mawa)
1 cup powdered sugar
1tbsp roasted while seasame ( Till)- for topping)


Method-

*Dry roast the sesame seeds in a pan/kadhai on medium heat till they turn light golden brown in colour, while stirring continuously.
It will take around 4-5 minutes.

*Make a coarse powder from it in a mixer/grinder. Keep aside it.

*Heat a pan /kadhai ,add mawa and powdered sugar along with sesame powder.
Mix well.
*Cook on very low heat (sim) for 2-3 minutes, while stirring occasionally.

In the meantime grease the 1/2 inch deep bottom thali or plate by a little ghee.(just1/2tsp of ghee is quite enough )

*Switch off the gas. Immediately after that put the til mawa mixture on grease plate.


*grease your hand with ghee, gentle spread the mixture evenly with help of your palm.
Tap it. Make sure that  the mixture is evenly spreaded.

*sprinkle some roasted sesame on the top and keep aside for 1/2 an hour.

*After that cut into in a small  equal cube shape.

Awesome barfi is ready to eat.
Make this til-mawa barfi on this occasion and enjoy awesome makarshankranti with your family.


Till then ,
Bye

We are signing off.
We will come very soon with more exciting recipes.

Bye,
Take care
Asha
Archana

Our thoughts
Cook &share
Happy Cooking.


Saturday, 9 January 2016

Winter special- Makai ki roti and sarso ka saag

                 Makai ki roti and sarso ka saag


Hi, everyone,
We are here once again with a very famous pure punjabi cuisine. An Indian recipe -Winter special-- Makai ki roti and sarso ka saag is not very popular  in punjab but also appreciated by all over India.

Makai(Maize)  roti is very good in taste accompanied with sarso ka saag and gur (jaggery) make this recipe rich and royal.

Most of Indian's  are fan of this green sarso saag-- creamy  leafy greens ... With dollop of butter and makai ki roti(bread) make this recipe lip smacking and finger licking.

But  the saag take time to make it,and maize ki roti is little difficult to make it.

That is why, many of our home maker avoid to make it.

But ,do not worry for that ,I have remedy  for you.

Here I will suggest you, how to make makai ki roti in very simple method.


These days people want to aware that  what they eat? Is it healthy or not?


So friends,
Before going to recipe details, I want to share some goodness of - mustard green and maize. In another session I shall share you the goodness of spinach and bathua).


Maize---( makai)

maize(corn) is good source of vitamins and minerals,carbohydrate and proteins and fibre content.

*Rich in vitamin A and vitamin B1(thaimine).
*Rich in protein.
*Good source of anti oxidant.
*Boost immune system.
*Good for eye sight.
*very good laxative and rich in fiber- good for reduce your weight.
Prevent anemia.
*control diabetes.
*Good for skin.
*Good for heart.
*Because of anti oxidants ,its help to fight cancer.

 Mustard Green's ( sarso ka saag)

*low in calories and fat..help to reduce hemmorriods, colon cancer and constipation.

*very good source of vitamin K..
-- play role in Alzheimer's disease patient by limiting neural damage in their brain.

*Rich in anti oxidant..like flavoniod and sulforaphene, carotene,indoles- proven benefit against colon,prostrate ,breast and ovarian Cancer.

* Fresh green leaf of mustard is a excellent source of vitamin C.
vitamin C is a natural anti oxidant,which help to protect against free radical injury and viral infections.

*Very good source of vitamin A-good for eye sight.

*fresh mustard greens are very good source of several essential minerals..like calcium, iron , potassium, magnesium,selenium, magnese, and zinc.


One should eat fresh mustard green on regular basis to prevent arthritis,iron difenciency anemia,asthma,cardiovascular disease, colon and prostrate cancer.


Ghee-( Clarified butter)
*Ghee has CLA(conjugated linoneic acid)- prevent cardiovascular disease.
* It can help to heal your digestive tract.
*Because of CLS - its help to reduce weight.
*Anti inflammatory and anti cancer.
*It is good  for healthy immune system.

There are many other health benefits of these veggies and ghee.The list are too long.
Here  above,I want to  share with you some important health benefits.

So friends, if you are not aware of these goodness of your food..please come and know how beneficial our food are?
 we  should regularly incorporate green leafy veggies in our diet plan.


Before taking much time, lets quickly go through the right recipe.!


Let's us start with sarso ka saag-

Preparation time: 30 minutes
Cooking time:25-30 minutes
Makes for 5-6 person

Ingredients-

* 1 kg mustard green leaves ( sarso) ( wash and cleaned)  finely chopped
*1/2 kg spinach (palak)  wash and cleaned (finely chopped)

250 grams bathua(goosefoot) wash and  cleaned  finely chopped(optional)

2-3 tbsp grated ginger

2tbsp very finely chopped garlic

2-3 medium size onion finely chopped

2-3 medium size tamotoes( finely chopped)

4-5  slited green chilies

1 tsp red chilli powder

1tbsp  garam masala  powder( use home made garam masala powder for good taste)

1 tbsp maize flour(optional)

4-5 tbsp  desi ghee(clarified butter)

1 tbsp butter

Salt to taste


Method-


*Heat 3-4 cup of water in pressure cooker.

*Add chopped greens to the water.

*Add 1/4 tsp of salt ,cover with lid and cook on high heat for one whistel , lower the heat and cook for 10-12  minutes or till the saag (greens) become soft.

*Remove from the heat.

*Strain and reserve the stock of this veggies greens.

*churn or coarse paste the greens (saag) in a mixie for 30 seconds.
                                            Or
(Put the boiled saag in a pan and mashed with a masher for 3-4 minutes or till it get smooth texture)
(Do not fine puree the saag. The texture of saag should be coarse.)

*Heat ghee in a non stick pan / kadhai.

*Add  grated ginger and crushed  garlic.

*saute for a minute on medium heat.

*Add slited green chillies, and finely chopped onion .

*Saute for 2-3 minutes  on medium heat or until onion become pink in colour.

*Add chopped tomatoes and pinch of salt, mix well and saute for 2-3 minutes on low heat  till tomatoes becomes tender and mashy while stirring occasionally.

*Add chilli powder,garam masala powder, mix well saute for 20-30 seconds.

*Add maize flour , mix well and saute for 20-30 seconds.

*Add saag  , mix well .

*Add reserve stock little by little. Mix well.(Use  the quantity of Green's stock  with your preference)


*Cook on medium heat to low heat  for 10minutes,while stirring occasionally.

*Add salt , mix well and cook for a minute.
Check the consistency ( it should be not very thick nor very thin)or adjust consistency with your preference.


*serve hot and garnish with dollop of butter.(1 tbsp).


Makai ki roti( maize flour roti)--


Preparation time:5 minutes
Cooking time:20-25 minutes
makes 8-10 rotis


Ingredients-

*5cup Maize flour

*1cup wheat flour

*2-4 tbsp wheat flour for dusting

*salt to taste

* Luekwarm Water for kneading the dough

*Ghee or refine oil for shallow fry the rotis

*3-4 dollop of butter(2-3 tbs)


Method-

*Take a bowl ,add maize flour and wheat flour and salt .

*Using lukewarm water ,knead the dough gently for about 5-7 minutes.

* Cover it and rest it for 5 minutes.

 *Heat a non stock tava.

*Take small portion or ball of dough. Make peda of it and dust by wheat flour  and roll the gently by rolling pin.

(Make roti of your desired shape or thickness)

*place the roti on hot tava,

*Add 1 tsp of ghee /refine oil on each side of roti.

* Cook it on medium heat for each of side until you find golden brown spot in your roti.

*Roti is ready to serve. Rub /apply butter on rotis.

*serve hot with sarso ka saag and Gur.(jaggery).


Note-My mom tip--

*This roti making method is for beginner.
If you want to make roti as conventional method , do not dust the dough in a flour  or roll by rolling pin while making makai roti).

Make makai ki roti by this method-
*Take a ball of the kneaded dough.
*spread a muslin cloth, place the ball on muslin cloth.
* simply -with wet hand, flatten the ball to make a roti.( do not use flour for dusting if you want to make with  this method)
                                     Or
(You can use plastic sheet instead of muslin cloth-  this is a another option for maize roti making method)

*Expert can make with their  hand( using by their palm and finger).


* For health point of view-you can make without using any oil or ghee.
Just apply butter on the last moment of cooking and serve hot.

*Always  use hot or lukewarm water for kneading the dough.

*  you must have a question in your mind that why I am using wheat flour for kneading the dough along with maize flour?


Answer-- is that maize flour have less elasticity for kneading the dough.if you take whole maize dough ,it might break while rolling it.
Wheat flour have gluten ,adding in a maize flour help the dough to bind enough for making roti smoothly.
knead for at least 5-7 minutes for good roti in texture and taste.


For saag -

*Maize flour is optional. Use maize flour while cooking of saag if you like  it's taste in saag..otherwise skip it.The reason behind of use the maize flour  in making saag for smoothing the texture of saag.

*You can make saag in refine oil instead of ghee, but if you want authentic taste of sarso ka saag ..then follow my steps.

*Always thoroughly clean the  geeens veggies about 3-4 time in running water to remove the mud attached with greens).

*Do not fine puree the boiled saag. Always mashed or coarse paste them for authentic panjabi  saag taste.

*you can skip garam masala in making saag  but I suggest you to add it for very awesome taste.It taste very good.

Serve with  a dollop of butter for rich and awesome taste.


That's all for today.


Do enjoy  your winter with this healthy and delightful yummy taste of punjab.


Take care.


We are signing off.
Bye.

Asha
Archana

Our thoughts
Cook & share
Happy cooking.


Sunday, 3 January 2016

Mumbai style pav bhaji

                                     Pav bhaji                             


Hello, everyone,

A warm welcome to our kitchen.
 We are here again with  a very popular street food of Mumbai. ya -- You are right ..I am telling about Mumbai style pav bhaji.
Today we are  sharing you a very authentic recipe of pav bhaji.

Bhaji with buttered pav make this recipe lip smacking and finger licking.

This very simple street food is everyone's favorite.
My Whole family  love to eat and enjoy this preparation of yummy pav bhaji.

Here I am sharing you a very  simple method of  making very popular pav bhaji. Very simple..my style  of making pav bhaji..
100% Mumbai's style pav bhaji.

Come join with me...and enjoy making pav bhaji...


Pav Bhaji


preparation time:10-15 minutes

Cooking time:10-15 minutes

Serve for 4-5

Ingredients

For bhaji-

500 grams of  boiled mix vegetables
(potatoes, cauliflower, peas,capsicum)

(For this 500 grams veggies ,you need under noted vegetables)

3-4 medium size boiled and half  mashed potatoes (approx 2 -3 cups)

2 cup cauliflower florets(cut into small pieces)

1cup pea's (matar)

2 -3 large tomatoes (finely chopped)

1medium size finely chopped capsicum (shimla mirch)


For gravy-

2tsp garlic paste

2onion finely chopped

3tsp pav bhaji masala

5-6 tbsp refine oil

1/2 tsp red chilli powder

4-5 tbsp of butter

Salt to taste

Water as required (approximately 11/2 to 2 cup)


For buttered  pav-

12-14 pav

50 gram butter for shallow roasting the pav

For garnish -

2tbsp finely chopped coriander leaves

For serving -

Onion rings squeezed with lemon

4-5 dollop of butter


Preparation --(for boiled vegetables)

*Rinse the vegetables in water .

*Heat 3cup of water add cauliflower and peas .

Boil until vegetables become tender or soft.

*strain the excess water. Keep aside .

*Do not boil capsicum.

*Lightly mashed potatoes.


Method --(bhaji recipe)


*Heat oil with 2 tbsp of butter on medium heat in  a non stick pan.

*Add garlic paste ,shallow fry on medium heat  for 20 seconds.

*Add  chopped onions. Saute for 2-3 minutes on medium heat or till onions becomes soft.

*Add chopped tomatoes, pav bhaji masala,red chilli powder and1/4 tsp of salt.

*Cook on  low to medium heat for 2-3 minutes until tomatoes become tender and masala leaves the oil ,while stirring occasionally.

*Add boiled vegetables( half mashed potatoes,cauliflower,peas).

*Cook on  low to medium heat for 2-3 minute,while stirring occasionally.

*Add capsicum and salt and cook on medium heat for 3-4 minutes.

*Mash the vegetables  directly on a pan by potato  masher.

*Add water ,and gently mix them.(add water according to your preferences)

*Cook on medium heat for another 3-4 minutes.

*Check the consistency of veggies, (It should be nor very thick or not very thin).

*Add 3 tbsp of butter. mix well.

*Garnish with fresh  finely chopped coriander  leaves.


For  butterd pav-

*Slice the pav in half.

*Heat some butter on non stick  flat pan or tava.

*keep the  2-4 piece of bread pav on butter and lightly fry(toast)  on medium heat for a minute from each side of pav.


*Like wise roast all  the pavs.

*Serve hot bhaji with buttered pav with raw onion rings dash with lemon juice.


*Add a dollop ( piece) of butter in  bhaji while serving.


Yes ,enjoy making the pav bhaji recipe just the way I have  made it,you will certainly hear complimentary comments from your near and dear ones.


My mom tips-

*Always use boiled vegetables while making bhaji for pav bhaji.

*Never boil capsicums with other vegetables.

*Add capsicums  in last moment of cooking.

*Use butter with refine oil for making pav bhaji's bhaji. You will find very awesome taste after adding butter in bhaji.

*Never overcook your masala.always cook masala on low heat.High heat burn the masala's.- taste bitter.So avoid high heat while cooking masala.Increase heat when you add water in bhaji-This is a tip for good colour for bhaji.

*Add salt asper your taste.

* Do not buttered the pav on high heat. Always butter the pav on medium heat while lightly press  the pav with spatula occasionally on each side.

*Always use generous amount of butter while buttering the pav-you will find awesome taste.

*Serve  always with lemoned onion rings.


*If you follows these very simple tips while making pav bhaji..I am sure your pav bhaji will rock on your home's dining table,and you will be blessed with many complements. Mumbai style pav bhaji..with lots of butter on pav..yummy  awesome pav bhaji.

Ya, I am 100% sure that by following these steps while cooking pav bhaji, You will be honored by your family members and friends by as a perfect  cook.


So,friends, that's all for today.

We will come back very soon with some winter special recipes.

Till then.
Bye.

Asha
Archana

Our thought
Cook &Share
Happy Cooking.


Monday, 28 December 2015

Sweet Winter with Sweet surprises -- Gajar Halwa

                            Gajar  Halwa
Gajar  Halwa 

HI,

Everyone,

A VERY GOOD  MORNING!

Welcome to our kitchen. Myself Archana, here again  with my mom Asha.

Today , we are making  a very popular Indian  recipe of winter-Gajar Halwa.
Well known sweet dessert of panjabi cuisine-- (Carrot Halwa).

Everyone favourite for its royal and rich taste.
Ya, winter unfold it sweet surprise with very sweet delicious awesome gajar halwa.

Every person has its own way of making halwas. Some people make  with only by milk and some with khoya(mawa) or  some  with milk maid. It's upon you that which method  suit  you.

But here ,I am sharing you the secret  recipe of my favorite awesome Gajar halwa.


Before that, I want to share with you some goodness of gajar(Carrot).

Yes  Guys,

Do you have ever noticed the health  fact of this simple  looking carrots?


In my point of  view, every  person should  eat carrot  in any form of --just have it raw in a salad,or make cake with carrot, make halwa or in pulao,chowmin,fried  rice  e.t.c any thing  do you  want to make with..do with your choice and enjoy the goodness of this boon root  vegetable (fruit).

Carrot  health  benefits --


*Carrot  has beta carotane and fiber content.
*It is a good source of anti oxidant agent. Because its anti oxidant properties, it helps to  decrease the probablity of developing cancer.
*Carrot is rich source of vitamin A.
(vitamin A  has beta carotene is very good for vision),
*carrot  has vitamin K,vitamin B8,and panthothenic acid, folate,potassium, iron, copper and magnese too.

*Carrot act as a natural cleanser that help to remove plaque and dirt from your teeth and gums when eaten.

*The anti oxidant and phytochemicals in carrot may also help to regulate blood sugar level ,prevent heart disease and stroke.

*Carrot support youthfulness-delayed aging process.

*Carrot help to improve our immune system.

*Carrot improve to quality of breast milk.

*Carrot can be  used as a  natural antiseptic when applied in cut or wound.


So friends,

I am making gajar halwa....my mom favourite.. She always enjoy making gajar halwa and  love to serve our guest as well as us.

In winter season you will  be noticed that in every party menu gajar halwa has come out as a everyone's favourite. It is heart of Indian cooking menu.(especially in winter)

Here, I am going to share you, how to make glossy tasty awesome gajar halwa with very simple method.

Come , let us start..


Gajar Halwa
(Carrot Halwa)


Gajar Halwa--


Preparation time:15-20 minutes
Cooking time- 10-15 minutes
Serve 3-4


Ingredient-


4 cup  peeled and grated carrot

1/2 cup Ghee

15tbsp Sugar

1 cup Mawa (Khoya)

1/2 tsp – Elaichi powder( green Cardamom)

1 tbsp- Blanched chopped Almond (Badam)

1 tbsp- Kismis (Raisins)

1 tbsp- chopped Kaju (Cashew nut)

1  tbsp- chopped pista( pistachio )


Method--


*Heat 2 tbsp ghee in non stick pan. Add carrots and sugar mix well.

*Saute for on medium flame for 2-3 minutes. Cover it by lid and cook it on lower flame for 3-4 minutes or till the carrots become soft or tender, while stirring occasionally.

*Open the lid,add remaining ghee.
Cook it on medium flame for another 2 minutes, while stirring occasionally.

*Add Mawa,mix well and cook it on high flame for 1 minute, while stirring continuously.

* Cook for 1 minute or until halwa leaves the pan.

3. Add cardamom powder, 1/2 tbsp of raisin, 1/2 tbsp of almond, ½ tbsp of kaju, 1/2 tbsp of Pista and cook for ½ minute.

4. Remove from the flame.

5. Garnish with  remaining almond, pista, kaju and kishmis.

6. Serve hot.


My mom tips-

* Always peel gajar before making halwa.

*Always check the heat as required, because it will burn the  carrot.Burnt carrot taste bitter.

*Always grate the carrot thick in texture. Use thick hole  grating grater while grating the carrot.
Thickly grated carrots are good for halwa texture as well as in taste also.

*Always use desi ghee while making halwa.
Do not  cut the quantity of ghee while making carrot halwa.
 Because it's make halwa rich and royal.


* Use as possible as homemade mawa( khoya),because it is 100% pure and it taste good than shop bought one.

* Do not use milk in  while cooking  carrot halwa because it will  coat the grated carrots  make a layer on it seems very unattractive and diminish in looks.

*Always cook the grated carrots in a sugar in first few minutes of cooking time.
Cooking in a sugar looks glossy when it will come out finally.


These are the few tips while making super yummy gajar halwa.

If you are a foodie, you will certainly make and  enjoy the rich and royal taste of this authentic gajar halwa recipe.


So friends,

Do enjoy your winter with making delicious lip smacking  and finger licking carrot halwa at your home .

Because if you lose the opportunity to taste this awesome sweet in this winter, you will certainly  lose something very special


That's all for today,


We shall come back very soon, with some more exciting tasty, mouthwatering recipes.

Wait and watch.


Till then ,
Bye,

Asha
Archana

Our thoughts
Cook&Share
Happy Cooking.


Wednesday, 16 December 2015

Kids favourite... McDonald's style french fries..

                              French fries


French fries


Hello,
Friends.

Good morning and a warm welcome to our kitchen. Myself Archana  with my mom Asha here with our new cooking session.. This  session is dedicated to our kids only..


These days kids always kick their mom...
mom french fries ..french fries.. McDonald's french fries... But it is not  always  possible to do that.


Sometime , you do not have time to take them to the shop and buy french fries for them and it  is not at all very cheap. But do not disappoint your kids.

You can make it at your own kitchen in a  minutes.. Very simple and very tasty ..crunchy-munchy , yummy french fries at your home in few minutes..


 Ya....Grab the opportunity to win  your kids heart with McDonald style french fries.
we  are here with absolutely right recipe of McDonald's style french fries.


100% right and genuine recipe of french fries are waiting for you..

Come, grab the opportunity to learn how to make McDonald style french fries..comes to you from the shop here.


Is it looking so tempeteting..?


Ya, looking na..shop  like look ..!

Yes, you can make it at your home...very simple and quick recipe...but  for this-- you  have to prep 4-5 hours before when you want to fry this..


Nothing to worry for that..
Follow me , I am sure you will find certainly very good result.


Let's us make .. McDonald's style french fries at your own kitchen..I am sure by  eating the super tasty french fries ,your kids must be calling u ---my mom ---master chef..!

McD at home...your favourite, your kids favourite.


French fries!


Cooking time:15-20 minutes
Preparation time:4-5hours
Serve for 2-3


*Ingredients--


4 big size long length non starchy potatoes(Aaloo)

Salt to taste

Oil for deep frying


*Method--


*Wash and peel four  big size non starchy potatoes.

*Cut into a slices then further cut into finger shape (batons).

* Rinse 2 to 3 time into  normal water.

*Boil adequate water in deep non stick pan.

*Add a little salt (about 1/2tsp) to the boiling water along with potatoes fingers.


*Cook on high heat until potatoes are three fourths done(75%).(this process is called blanching the potatoes- just under done the potatoes .about 50 % to 75% done).

*Strain the potatoes fingers and  pour little  cold water over the potatoes fingers.

*Pat dry on the kitchen towel or muslin cloth.

*Transfer into a zip lock bag or haldiram bhujia zip lock pouch.

*Seal it and freeze it  for 3-4 hours in a refrigerator.

*Heat sufficient oil on deep  nonstick pan.

*Deep fry the frozen potatoes fingers  on high heat till  light golden in colour.

*Take  out  from the oil.

*Drain on the absorbent paper or kitchen towel. Absorbent paper or kitchen towel will absorb excess oil from it.

*Sprinkle a little amount of salt and mix it.

*Serve hot with ketchup or sandwiches,Or simply have it just like that.

*Enjoy this McDonald style french fries  with your kids and families.


Note--

*you can make this french fries in a air fryer too.  After blanching the potatoes fingers, you should rinse in a cold water for a minutes. Strain the  excess water and pour some amount of oil (1-2 table spoon ) on it..mix gently.
Pre heat the the air fryer on 190 degree Celsius or 375 degree Fahrenheit for a 2 minute.
Put oily potatoes on the griller and grill for same temperature for  3-4 minutes.
Take it out after that and enjoy grilled french fries.

 *This  is the  healtheir version of making french fries,but I prefer frying in oil rather than grilling in air fryer .Because it's taste not very authentic as McDonald's  style french fries.
Do as your preference.

*But I suggest  you not to grill . Make the way I have made it.. Above method (by frying in the  oil) I am sure,you will be happy.- cause it's taste just like  real McDonald's french fries.--yummy!


My mom tips-


*  Is there a question in your mind? why we use non starchy potatoes or how to choose them?

*Here is the answer... First -- why we use non starchy potatoes-- cause  non starchy potatoes take time to turn red. They do not turn easily red while frying. That is why when u fry these potatoes fingers ,it's take time to fry and remain maintain its colour ..then after frying  for  few  minutes it will come out golden in colour .Inside soft and outside crispy ...just like McDonald french fries... In McDonald shop ..they use non starchy potatoes.

*How to choose/recognize non starchy potatoes-- ?

*Answer is-- the non starchy potatoes have very less amount of of starch.
 This is not at all firm in outer covering(I mean the skin of potatoes are not firm at all) just like this...


*Use long size potatoes as far as possible for  nice long  french fries.
* Use zip lock bag or haldiram bhujia's zip lock bag for freezing them.
Like this...


*So friends.. Make these french fries  just the way  I have made it. I am sure,you will be very happy  to make it and win your kids heart.

*That's all for today..
*We shall  back  here very soon with some more exciting recipes.


*Till then..
*Bye.
*Good luck.


Asha
Archana.


*Our thoughts
*Cook&share
*Happy cooking.


Friday, 4 December 2015

Enjoy winter delicacies-- start with hara chana ka halwa


                      Hare Chane ka halwa


Hi,
Everybody,


 Good morning !


A warm welcome to our kitchen.. Me Archana here with my mom Asha!

Celebrating today, my brother marriage anniversary...


Making something special for this occasion.. Among them ..one dish is my favourite...  Which ,I am going to share with you... Ya, you are right..Awesome.... Hare Chane ka halwa... I am sure this dish  will gonna favourite for all of you...new na..( Gajar ka halwa toh ghaya hoga ...hare chane ka khaya hai kya?)


Everyone know hara chana (cholia) ,and make dishes..the salted one...but very few  one knows that making sweet dish from cholia ( hara chana)  becomes  super
awesome.


It's come out very delicious and  it looks very tempteting and tasty. I love its green colour.


Chana is rich source of protein.. Protein is very essential for children health as well as elderly also. So eat chana as any form or in salted or as a sweet.


 Do You know?  winter is known for khaney ka mausam. Lots of green veggies with variety of parathas with  abundance of sweet dessert make  the winter  royal and rich ---- the king season..

Don't you  think so? Hai na!

So,why are you waiting?

come join with me and enjoy your entire  winter with  plenty of rich dishes... Halwas, soups, parathas, saag, makai ki roti, pulao, fried rice, Manchurian , koftey, littis and many more sweet and sour dishes... The list is quite long...! Isn't it!


So dear, do enjoy your days with super awesome recipes.

But ,now at present--- muh  toh mitha karo...with this super duper tasty hare Chane ka halwa.

Simple but very rich and tasty.
Ya, I am here to share with all of you..my favourite hare chana ka halwa.


Come , let's prepare... The right recipe here.


Hare Chane ka Halwa----


Preparation time- 10 minutes
Cooking time -20 minutes
Makes for 4 people


Ingredient---


 2 cup Hara chana

¾ cup (khoya)

¾ cup sugar

½ cup ghee

1 tsp Cardamom powder

1 tbsp Almond finely chopped

1 tbsp Cashew nuts finely chopped


Method--

*Wash the hara chanas.

*Heat the pan Add 2 cup water.

Add chanas and boil it in a water on high heat until the chana becomes tender or soft.

*Add a  tablespoon of sugar while boiling the chana's.

*Sieve in a stainer. Keep aside it.

*Put chana in a grinder; grind it to a coarse paste ( like rava). Take out the paste in a bowl.

*Heat a non stick pan, add ghee and chana paste.

*Cook it on medium flame for 4-5 minutes or till the chana paste leaves the pan, while stirring occasionally.

*Add sugar cook for  3-4 minutes on medium flame.

*Add khoya, and cook for 1 more minutes.

*Add cardamom powder, mix well.

*Switch off the gas.

*Garnished with chopped almonds and cashew nuts.


My mom tips--

* Do not cover the lid ,while boiling the hara chanas.Adding the sugar  or a pinch of  baking soda in the  time of boiling will make its colour retains as it..green in colour.

* you can make this halwa without boiling the chana's . For this------just coarsely grind it in a grinder and after that use as required. But we prefer boiling it, because of the colour and convenience.


* Always prefer desi ghee,while preparing halwas and sweet dessert. Believe me,it will come out awesome.


*Always grind the chana in coarse paste.  The coarse texture of chana( like rava) come out awesome in taste.


*Always prefer medium heat while making halwa.It prevent to burn the halwa.

*Add sugar according  to your taste, while making halwa.


So, dear friend,that's all for today.


We shall come very soon, with more winter delight.


Till then,


We are signing off,
Asha
Archana


Our thought--
Cook& share
Happy cooking.

Friday, 20 November 2015

Laziz Aloo tikkis--- the real joy of taste


Aloo tikki


Hi,

     Foodies,


I am here, again with delicious aloo tikkis . ya, my bro favourite aloo tikki.. Sharing  all of you a simple but awesome  one.


I believe that snack with aloo is always be a good option.
Because it's take less  cooking time and easily available  in any one kitchen.
Aloo preparations  is always kids fab too.


Eat aloo tikki with in chaat preparation or simply have with chutney --taste  super awesome. 


As a snack aloo tikkis are always be a rock and every one favourite.
I  am making this tikki using ghee-- you can make in any vegetable oil according to your taste.


I prefer shallow fry for seeking healthy version. You can deep fry this. But before  deep frying this ,use maida - water mixture batter for dipping it and then roll out each tikkis in bread crumbs . after that deep fry these  tikkis and taste the  super tasty aloos tikkis and make ur day really delicious.


Make these  tikkis for your  guest and  I am sure after eating these tikkis you will certainly enjoy the delicious comments from them.
Before making the tikkis ,I want to share the a little goodness of aloo .


*Aloo is very good source of potassium, that help to reduce the blood pressure level.
so guys, don't waste time -- quickly, write down the super easy and tasty tikki recipe  and enjoy the real joy of taste.


Aloo tikki


Preparation Time-12minutes
Cooking time- 10-12 minutes
Makes 6 tikkis


Ingredients-


2 cup boiled peeled and mashed or grated potatoes)

1 tbsp grated ginger (adrak)

1 tsp very finely chopped green chillies

3 tbsp very finely chopped onions

½ tsp turmeric powder (haldi)

1 tsp- garam masala powder

3 tsp of ghee

2 tsp amchur powder (dried mango powder)  or according to your taste

3  medium size bread  slice ( cut the brown edges and soaked in water then squeeze out the excess water)

2 tbsp of corn floor for dusting the tikkis

Ghee for shallow fry

Salt to taste


Method--


*Heat 3 tsp of ghee   in a non stick pan or kadhai.

*Add   ginger, green   chillies, sauté on medium flame for few seconds.

*Add   onions   and sauté on medium flame for 2 minutes.

*Add turmeric powder, garam masala powder, amchur powder salt and sauté on simmer for 1 minute.

*Add   potatoes  Saute   on medium flame for 1 minutes, while stirring continuously.

*Switch off the gas and allow it to cool completely.

*Once cool add  3 soaked and squeeze bread slices.

*Mix well.

*Divide the mixture in to 6 equal portions.

*Shape each portion in like a peda (tikki)  or leaf like shape, according to your preference or taste.

* Dust each tikki with cornfloor. And keep aside for 10  minutes in a refrigerator.
(Freeze)

*Heat the broad non stick pan  on medium flame.

*Add 5-6 tbsp of ghee .Place each of tikkis gently on pan.

*Shallow fry them on medium heat till they golden brown in colour from all the sides .

*Serve hot with (dhania) coriander  chutney or tomato ketchup and (onion cucumber rings--dipped in lemon juice) and enjoy this awesome tikkis.


My mom tips--

* Use less amount of water ,while  boiling the aloos (potatoes) in pressure cooker--because it will take less time to cook.

Example- For 4-5 aloos --use 2 cup of water and pressure cook for 1 or 2 whistle according to the  quality of pressure cooker and company.

So friend, use less amount of water for boiling the aloos  and save gas.

*Adding bread crumbs is must for making tikki , cause it help the potatoes to bind.

* Rolling the tikkis in confloor and resting in refrigerator is must, cause  doing this  help tikkis to bind  and shape and help  not  to stick on pan while shallow frying it and help to maintain a awesome look (golden brown) in colour.
Always maintain medium heat while shallow  frying.


* Use ghee for shallow frying. It will taste  delicious and richer.


So guys,


We are signing off for today.

Asha
Archana

We shall come very soon with our super easy and tasty bite.

Till then,


Enjoy cooking.
Happy cooking.

Friday, 13 November 2015

The real joy of mithai.. mouth melting coconut ladoo

                                                                                                              Coconut ladoo


                                                                                                          Coconut ladoo


Hi , Guys, 
         
Archana , here .with sweet awesome coconut ladoos. Ya , I am sharing u,  my friend rano's favourite ladoos..that I  have made in Diwali puja special. This ladoos are made with fresh coconut.  Juicy, creamy, texture of this yummy sweet , tempt us to eat more and more. Cooking this mithai is not very hardsome but scraping the coconut is quite tough,but not impossible. So the prep is tedious, but cooking time is very less than other mithai's. Here, I am sharing all of you, mouth melting sweet awesome coconut ladoos.  If you don't want to scrap the coconut , use desicated coconut  powder for this preparation. 

Hurry, guys..

Quickly, note down the right recipe here..hope you all  will enjoy the mouthwatering ladoos and want to make more times , and make your day really awesome.


Sharing coconut ladoos...because we believe that sharing  help us  to grow and learn..


 Kesari Coconut Ladoo


Preparation time: 25minutes
Cooking time: 15  -20 minutes
Makes 20 Ladoo


Ingredient--

1 can condensed milk

½ cup milk

2 1/2 cup ( scrapped  fresh coconut ) or  grated in fine grater after peeling the skin

20 tbsp desiccated coconut powder 

8 tbsp powdered sugar

10 -12 saffron strands (kesar thread)

4 tbsp lukewarm water for dipping the saffron string

For garnish----

2 tbsp finely chopped blanched pista( pistachio)


Method-----


*Combine lukewarm water and saffron in a bowl. Keep aside for 15 minutes. 

*Heat milk in a kadhai, add  scrap fresh  coconut powder and condensed milk . Mix well with the help of ladle.

*Cook on medium heat for 10 -12 minutes on medium to low heat  or until the mixture become semi thick or leave the corner of kadhai, while stirring occasionally. 

*Add powdered sugar, mix well.   Cook for a minute.

*Switch off the gas.

*Let them cool. 

*When the mixture become cool, divide 20 equal portion of the mixture and make ladoo with the help of your palm.

*Roll each ladoo in a desiccated coconut powder that the coconut powder becomes evenly  coated from all the sides of the ladoo . 

*If you want  to decorate this ladoo..follow me..

Take  one  coconut ball in your palm, and make  light press on the centre of ladoo with the help of your finger and pour  1-2 drop of saffron  water on it.

Likewise make all of them,then Garnish  each of them with pista.

*Store in a container.

*Serve  as required, and enjoy very tasty , yummy ladoo's with ur family and friends. I am  sure, after eating these ladoo's ,they will  honor you the title of best chef of world.


*My mom tip...

*You can use dedicated coconut, if you don't want scraping fresh coconut. But if you want awesome result, make  it the way that I am suggesting you.

*Rolling  coconut ball in the dedicated coconut powder is must. Because it help to bind the ladoos and it's look awesome, just like shop bought  coconut mithai.

* desicated coconut is easy available at any grocery store. (Also called coconut powder --in local language)


Coming very soon with new yummy recipe.

Till then,

Signing off..Archana here.

Enjoy cooking.


Friday, 6 November 2015

Refresh your evening tea with cheesey methi aloo tikki..


                                                   Cheesey aloo methi tikki


Hi guys,

               We are here with  our simple and tasty...evening bite. Ya ,you are right .I am tell about the cheesey methi aloo tikki.Have u ever tried. Methi with cheese. No ..na.!  I know you must be thinking that what a wrong combination...   Hahaha. Not joking ...yes , I have tried  and tested.. Methi  leaf with combination of aloo become very good in taste..with cheese, it become superb . Believe me , it gonna super tasty...ya sure...try  this !

I am going to share with u... You  must be thinking na..methi..the bitter taste, and aloo cheese and ghee .... Fat?  Don't think the negative aspects of food before knowing their goodness.... People thinks these are evelvate the fat growing process ....but think the positive side of these food..

 Before making any conclusion, let me  share some goodness of  these ingredients.


* Methi( fenugreek)...

 It's reduce cholesterol... Ultimately prevent cardiovascular disease.
*It relieve constipation because of it's dietry fiber... Rich in protein, magnesium, copperand iron.
* It's help to  control diabetes.
*prevent Colon cancer.
*increase breast milk  production in breast feeding women.
* aids  digestion and appetite suppressant..  Ultimately help to facilitate weight loss.

Ghee---

Do not bother...know the goodness of ghee---


*It's strengthen the immune system. (Immune system play  key role in our health..if our immune system is boosted ,we need not worry about any infections  that we are getting infected our day to day life.. Boosted immunity make our body to fight against any disease.
*It's boost the metabolism.. Do not surprised? Ya ...that why  help to reduce the weight gain.
*Great for our skin,prevent aging.
*Enhance and improve the eyesight ( prevent cataract)
*Full of vitamin A, D ,E ,k.
*Ghee contain arachidonic acid that are important for development and function of brain.that is why consumption if ghee make u intelligent and increase the memory.
*Ghee contain CLA - conjugated linoleic acid--strong anti cancer.
* ghee improve HDL level , which is very good for cardiac health.


Cheese---

* It is very good source of calcium, protein, zinc, vitamin A and vitamin B12.


So, these are pretty goodness of these products., but healthy if you  consume in a moderate and balanced way.

If you use ,one meal with ghee and cheese ,skip 2 days without these ingredients in your diet.

Excees  of anything always injurious for our health
..
Consume according to your metabolism, but don't compromise on taste.

That is why ,I am here with ..this yummy snack for your evening.

So, do not ,waste time, let's be foodies.


                                    cheesey methi aloo tikki


Preparation Time-12minutes
Cooking time-12 minutes
Makes 6 tikkis


Ingredients----


2 cup boiled peeled and mashed ( grated)potatoes

1/4 cup finely chopped fenugreek leaves (methi leaves) ,rub 2 pinch of salt for reducing  bitter of methi leaf.  Keep aside for 2 minute, then squeeze out the bitterness of methi.

1 tbsp grated ginger (adrak)

1 tsp very finely chopped green chillies

3 tbsp finely chopped onions

½ tsp turmeric powder (haldi)

1 tsp- garam masala powder

3 tsp of ghee

1tsp amchur powder (dried mango powder) or chaat masala

3 bread ( cut the edges with help of knife and soaked in water then squeeze out the excess water)

 3 tbsp Ghee for shallow fry

2-3 tsp  of refine flour ( maida) for dusting the tikki.

Salt to taste


Mehod----


*Heat 3 tsp of ghee   in a non stick pan.

*Add   ginger, green   chillies, sauté on medium flame for few seconds.

*Add   onions   and sauté on medium flame for 2 minutes.

*Add turmeric powder, garam masala powder, amchur powder   or( chaat masala) and  salt.

*Sauté on simmer for 1 minute.

*Add   fenugreek   leaves   ( methi  ) sauté  on medium flame for another 1 minutes.

*Add    madhed potatoes  Saute   on medium flame for 1 minutes, while stirring      continuously.

*Switch off the gas and allow it to cool completely.

* Onced cool add   3  soaked and sqeezed breads.

*Mix well. Divide the mixture in to 6 equal portions.

*Shape each portion in like a peda (tikki) .

*Take one peda or ball in  your palm, make  katori like shape with the help of your finger.
*Stuff a little amount of cheese in the aloo katori, then seal the edges with aloo mixture          and make roundel. Make sure that cheese is fully covered by the allo mixture, otherwise,        in the time of frying , they will come out...and stick in bottom of pan.

*Dust this ball  in a  refine flour ( maida).


                                                                    Stuff  cheese like this


                                                                     Make tikki like shape.
Tikki shape
*Make tikki like shape.

*Likewise make all the tikkis.

*Heat  3 table spoon of ghee in abroad non stick pan .

Place each of tikkis gently on pan.

*Shallow fry them till they golden brown in colour from all the sides .


*Serve hot with dhania chutney or tomato ketchup.


Make your evening yummy, by adding this snack in your tea time and enjoy  this cheese brust bite with your family and friends.


We shall be here very soon, with more refreshing sweet delight for coming Diwali.


Till then,


We -- Asha and Archana signing off.


Cook& share,
Happy cooking.